Workspace
Workspace, team and billing
Settings, roles, limits and balance.
How the workspace is organised
A workspace holds everything: your agents, phone numbers, knowledge bases, tools, conversations and balance. Settings is where you configure the workspace itself, and Billing is where you keep it funded. Settings is split across seven tabs, and the tab you are on is kept in the URL so you can link straight to it.
Most fields in Settings save as you go. You will see an autosaving indicator rather than a Save button on most rows, so a change is committed the moment you move off the field.
Settings
General
General holds your own profile, the identity of the workspace, and the defaults every new agent inherits.
- Profile: your first and last name are editable. Your email is read only: Used for logging in. Email address cannot be changed.
- Workspace: the Workspace name, the Workspace ID with a copy button, and the Data Region. The region is read only, Set at workspace creation and cannot be changed, so choose it deliberately when you create a workspace rather than expecting to move it later.
- Defaults: Default timezone, Date & time format, and Default agent voice. These pre-fill every new agent and can still be overridden on an agent by agent basis. The default timezone is also the timezone your daily safety caps reset in.
The API Credentials section on this tab is where developer access lives. It holds the workspace auth ID and auth token used to call the API from your own systems. There is one active pair per workspace, and rotating it revokes the previous pair immediately, so update anything using the old credentials before you rotate. See triggering outbound calls for how they are used.
Users
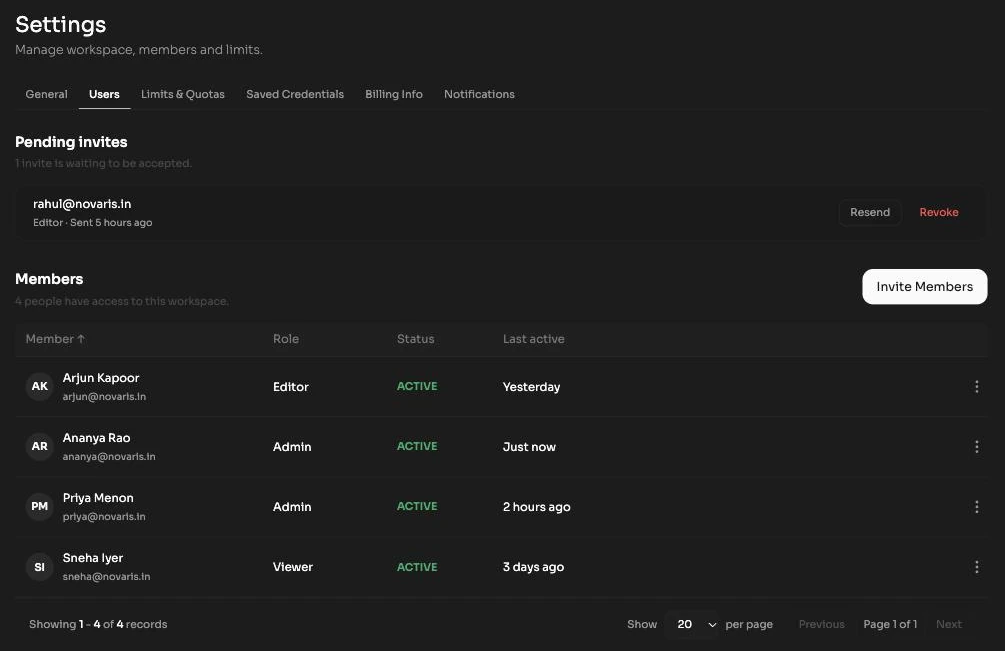
Users lists everyone with access, alongside the invites that are still waiting to be accepted. Roles are:
| Role | Access |
|---|---|
| Owner | The workspace owner. Not assignable through an invite. |
| Admin | Full access except billing and workspace deletion. |
| Editor | Can build and modify agents. |
| Viewer | Read-only access to agents and conversations. |
To add people, open Invite Members:
- Paste the email addresses, separated by commas or on separate lines. You can invite several people at once.
- Choose the Role they will get: Admin, Editor or Viewer.
- Add an optional personal message, then send. Each invite arrives as a link that signs them into this workspace.
An existing member's role can be changed from their row, and a member can be removed there too. Pending invites are listed separately until they are accepted.
Limits & Quotas
Limits & Quotas is your protection against a runaway agent or a mistake in a script that triggers calls. It has three groups:
- Max concurrent calls: how many calls the workspace can have in flight at once. It applies workspace wide and is capped by your plan.
- Max call duration: the ceiling on how long any single call can run before it is ended.
- Daily call limit and Daily spend cap: each is a toggle plus a value, and each acts as a kill switch. When one is hit, calls stop rather than continuing to cost you. Both reset at midnight in the workspace timezone.
These caps are enforced at the platform, not just in the console. A call your own system triggers over the API is refused with a clear error once a cap is reached, so set them before you point production traffic at an agent.
Saved Credentials
Saved Credentials holds the telephony credentials your phone numbers are imported under, for Twilio, Vobiz.ai and SIP. It is the same table you see on the Phone Numbers page, showing provider, account, name, how many numbers are linked, status and when it was added, with add, edit and delete actions. A credential is stored once per workspace and reused across every number imported under it, so managing it from either place has the same effect.
Billing Info
Billing Info is the company and tax detail printed on your invoices: GST Identification Number, Company Name, Address, City, State, Country and Pincode. All of it is required. Fill it in before your first recharge so the invoice you get back is the one your finance team can actually use.
Notifications
Notifications has two parts: Channels, where you choose where notifications are delivered, and a set of category toggles for what is worth telling you about.
- Calls: call failures (an agent failed to handle a call), unusual call volume (spikes or drops outside the normal range), and a caller requesting a human handoff when the agent has no transfer configured.
- Billing: low balance warnings as you approach your budget, payment failures, and the spend cap being reached, which means agents have been paused.
- Webhooks & integrations: webhook delivery failures after three consecutive failures, and an integration disconnecting.
- Reports: a weekly digest every Monday, and a full monthly performance report at month end.
The webhook and billing categories are the two worth switching on before you go live. Both tell you about something that has already stopped working.
Data & Compliance
Data & Compliance covers what happens to call data over time.
- Retention: how long call data is kept before it is deleted automatically.
- Privacy: the controls over how sensitive data is handled.
- Data export: exports everything in the workspace as a downloadable archive.
Billing
Billing reads Manage your plan, balance and payments. A balance header sits above the tabs and stays visible on all of them.
The balance header
The header shows your plan name, your remaining balance, and a consumption bar against it. On a trial it also shows when the trial expires, or tells you the trial credit has been spent. An Upgrade Planbutton sits on the right. Your balance is also visible without leaving whatever page you are on: the profile menu in the top bar shows Balance with an Add funds shortcut into Billing.
Recharge
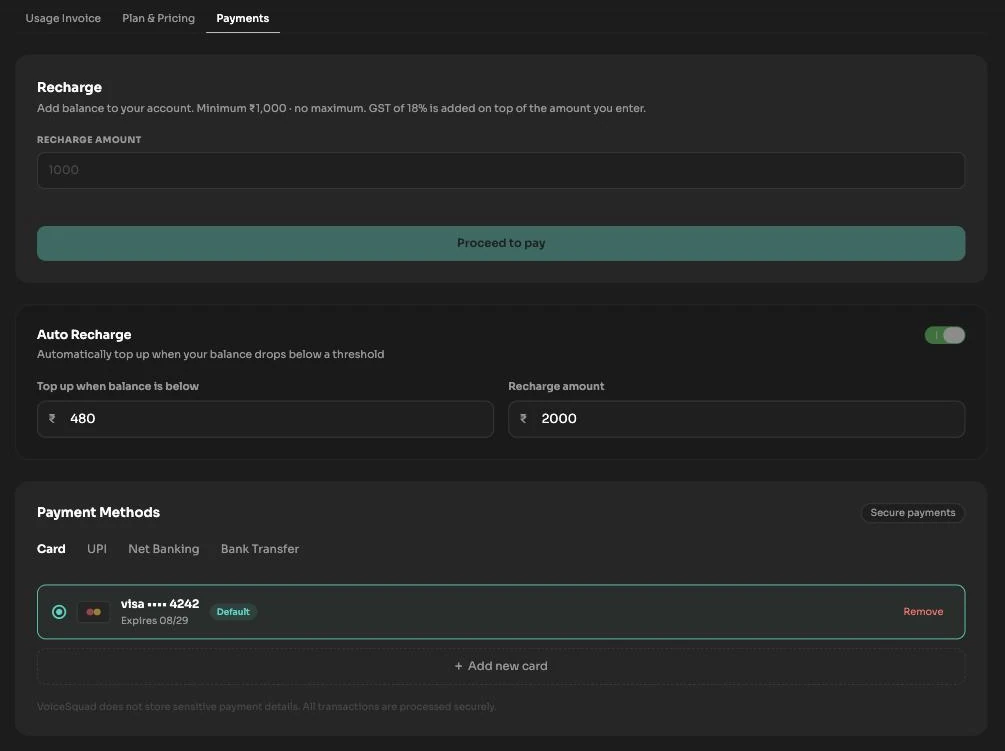
Recharging happens on the Payments tab. Enter the amount you want to add, above the workspace minimum and with no upper limit. Before you pay you are shown a summary of the balance being added, the tax applied on top, and the total that will be charged, along with an estimate of how many minutes of calling the top-up buys. Nothing is charged until you confirm that summary.
Auto Recharge
Auto Recharge keeps agents from stopping mid-campaign because the balance ran out. It is a toggle with two values: Top up when balance is below, the threshold that triggers the charge, and Recharge amount, how much is added when it does.
Payment methods
Payment Methods is where cards are added and managed. The card you save here is what both a manual recharge and auto recharge draw on.
Plans
There are three plans: Trial, Professional and Enterprise. The Plan & Pricingtab compares them across grouped feature rows: calling (incoming and outgoing calls, call concurrency), voices, building (knowledge base, playground testing, simulation runs, agent evaluation, conversation goal and outcome tracking) and workspace and access (multi-workspace, API access, dedicated support, custom data residency, custom integrations).
The upgrade path depends on where you are. On Trial, Upgrade Plan takes you to the Payments tab to recharge. On Professional, it opens an enterprise inquiry form instead, which is a conversation with sales rather than a self-serve change.
Usage Invoice
The Usage Invoice tab is your history: past usage statements and invoices for the workspace. What appears on them is driven by the details you filled in under Settings, Billing Info.
Call Cost column in Conversations, and the per-agent cost table on the Reports Cost & Latency tab.